
1. Choose a format
Start with a one-shot: a complete story in a single chapter. For a first manga, 8 to 16 pages is a realistic goal. Professional one-shots for magazine contests are often longer, but finishing a short one teaches you more than abandoning a long one.
If even that feels like a lot, try 4-koma (yonkoma): a strip of four equal panels with a setup, development, twist and punchline. Each strip stands alone, so you can make one a day.
2. Write the story and characters
Write the story in a few sentences: who the main character is, what they want, what gets in the way and how it ends. One-shots work best with a single goal and a clear emotional turn.
Design characters you can draw quickly and consistently. Give each one a distinct silhouette and hairstyle, since manga is usually black and white and readers can’t rely on colour to tell characters apart. Draw a simple model sheet with each character’s face from the front and side.
3. Storyboard the name
In Japanese manga production, the rough storyboard is called the name (nēmu). It’s a quick, scribbled version of every page showing the panels, rough figures and all of the dialogue. Editors review the name before any finished art is drawn.
Drawing the name first lets you fix pacing cheaply. Read it from start to finish: does each page end on a reason to turn it? Is any scene too long? Redrawing a stick-figure page takes minutes; redrawing an inked page takes hours.
4. Lay out the panels right to left
Manga is read right to left: start at the top-right panel and move left, then down to the next row. Speech balloons inside a panel follow the same order. Keep this in mind from the name onwards, because a page laid out left to right will read in the wrong order.
- Classic page: a steady mix of wide and narrow panels for dialogue scenes.
- Action page: a wide opening shot, then smaller panels that speed the reader up.
- Splash with insets: one big moment with reaction panels beside it.
- 4-koma: four equal panels read top to bottom, usually a gag or slice of life.
Panel size controls time and importance. A large panel or full-page splash makes a moment land; a row of small panels makes action feel fast. Most manga pages use four to seven panels. Let important images break out of the panel borders, and use the white gutters between panels to show the passing of time.
Print these layouts free with the manga panel template, including one-strip and two-strip 4-koma pages, or print a stack of mixed blank comic book pages.
5. Pencil, ink and tone
Pencil each page over your name, then ink it. Manga relies on line weight: thicker lines for outlines and figures close to the reader, thinner lines for detail and distant backgrounds. Speed lines and focus lines add motion and emotion without drawing a background.
Shading in black-and-white manga is done with screentones, patterns of dots or lines that read as grey when printed. Traditionally they were adhesive sheets cut out by hand; today most artists apply them digitally. Use tones for shadows, skin, clothing and mood, and keep pure white areas so the page doesn’t turn muddy.
6. Letter the pages
Place balloons so they read in right-to-left order and avoid covering faces. Japanese manga letters dialogue vertically inside tall, oval balloons; English manga uses horizontal text, usually in a clean comic font in capitals. Sound effects are drawn as part of the art and can be large and expressive.
For digital pages, the free speech bubble maker creates speech, thought and shout bubbles as transparent PNGs.
Make manga pages from a description
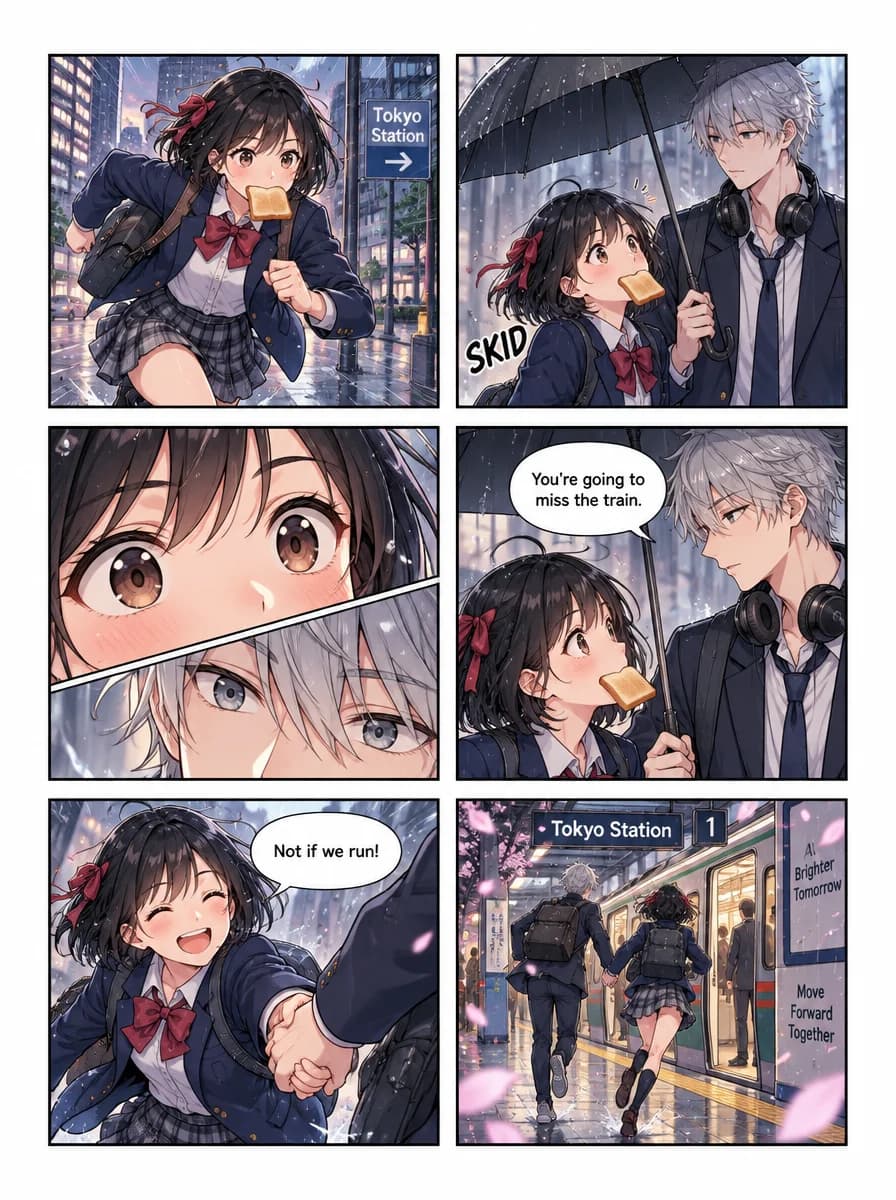
Create Comic has a Manga art style. Describe what happens on a page and it generates the finished artwork, lettering included, in the layout you choose. It’s a quick way to test a story before drawing it. We chose Manga and 6 panels and entered this scene:
Hana, a high-school girl with a short black bob, a red hair ribbon and a navy school blazer, sprints through a rainy Tokyo street at dawn, toast in her mouth, speed lines behind her. She skids under the umbrella of Ren, a tall quiet boy with messy silver hair and headphones. Close-up of their surprised eyes meeting. Ren says, "You're going to miss the train." Hana grins and says, "Not if we run!" She grabs his hand. End with both of them racing toward the station as the train doors open, cherry blossom petals swirling in the rain.
Your first generation is free. See the comic book guide for scripting and printing, or the text-to-comic walkthrough for the AI workflow step by step.
Make your manga